Are you looking to enhance your WordPress website’s visual appeal and user experience? Adding WordPress custom fonts can be a game-changer.
So, we are introducing PostX Custom Fonts. With the ability to use a unique combination of beautiful fonts, you can transform your site’s typography and overall aesthetics with PostX.
This makes your content more visually appealing, enhances readability, helps establish a strong brand image, and keeps visitors engaged for longer.
So, how to add custom font to WordPress?
- Install PostX.
- Turn on the Custom Font Addon.
- Upload Your Custom Fonts.
- Use Custom Fonts on every PostX block from typography settings.
In this article, we’ll explain how to add custom fonts to WordPress sites and discuss the benefits they can bring.
How to Find Custom Fonts for WordPress?
There are several online font marketplaces where you can explore a vast collection of both free and premium fonts. Here are a few places you can find custom fonts for WordPress:
- Google Fonts
- Adobe Typekit
- Font Squirrel
- MyFonts
And several other websites that provide free and premium fonts.
How to Add WordPress Custom Fonts (Step-by-step Guide)
You have to use a plugin to upload custom fonts to WordPress. And PostX, the most user-friendly and customizable plugin is here with its newest addon, the Custom Fonts addon. You can easily upload custom fonts to WordPress without any hassle.
So, without further ado, let’s move on with the procedures.
Video Tutorial
Here’s a video tutorial, so you can understand the PostX Custom Fonts in the best way possible.
Install PostX
To unlock the powerful features of PostX and take advantage of its features, you need to install the plugin.
To install and activate the PostX Gutenberg Blocks Plugin:
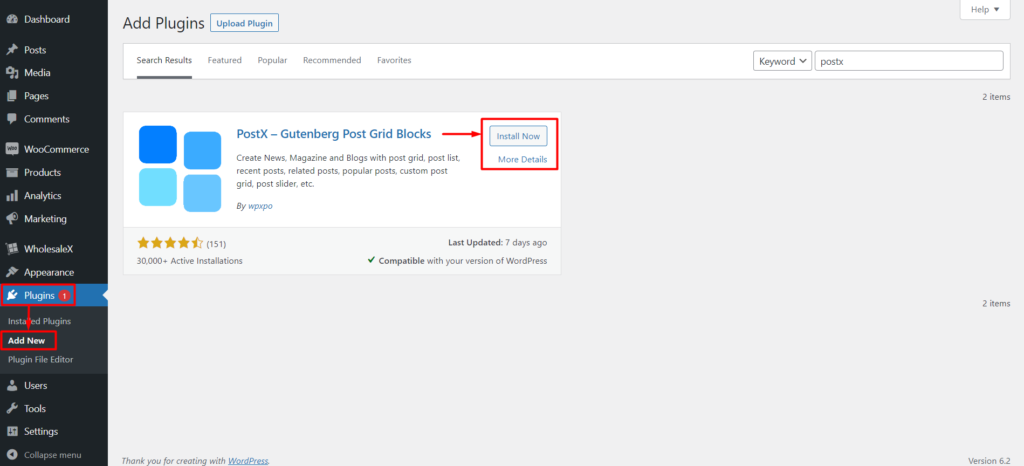
- Go to Plugins → Add New.
- Search for “PostX.”
- Click Install and then Activate.
Now you’re ready to enhance your website with WordPress custom fonts.
Activate Custom Fonts Addon
Now, you need to activate the Custom Font addon. Enabling the addon is a must before using custom fonts throughout your website.
To activate the Custom Font addon in PostX:
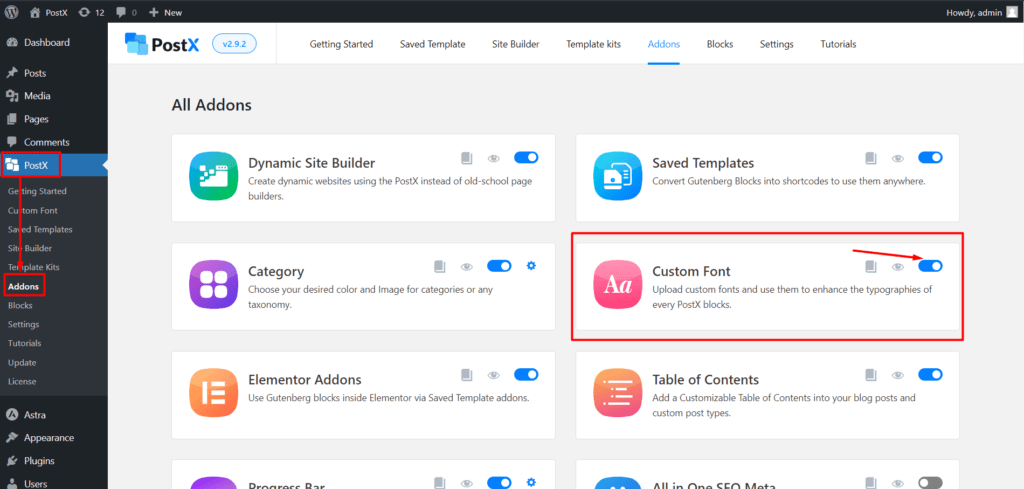
- Go to PostX → Addons.
- Find the “Custom Font” addon and toggle it on.
- The addon is now activated and ready to use.
You have successfully activated the Custom Font addon for PostX.
Font Weight Guideline [*IMPORTANT]
Here’s a guideline for choosing the perfect font weight for your custom fonts.
Font weight refers to the thickness of the strokes that make up the letters in a font. It is measured in numbers ranging from 100 to 900, with each number corresponding to a specific weight. For instance, 100 is the lightest font weight, while 900 is the boldest. Font weight plays a significant role in determining the visual impact of the text.
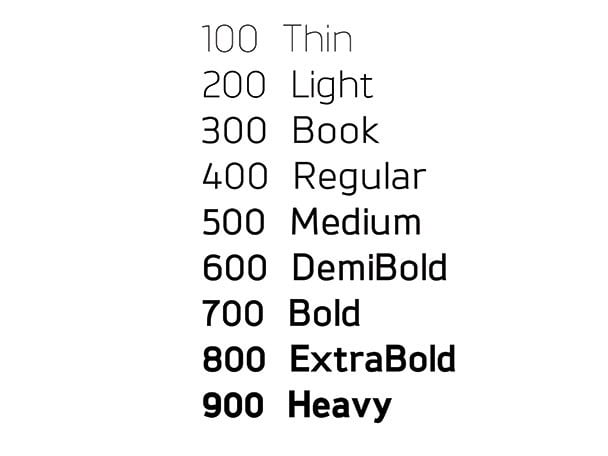
So, this rule is the same when uploading custom font variations with PostX. Suppose you have thin, normal, medium, and bold variations of a particular font. And for example, let’s give the font a name like “Example Font.”
So, now you have a font named “Example Font” with thin, normal, medium, and bold variations.
When you upload the font, use “Example Font” as the name for all the variations. But each time you have to change the weight.
For example:
When you upload the “thin” variation, select the weight as 100.
For “normal / regular”, select the weight as 400.
For “medium”, select the weight as 500.
For “bold”, select the weight as 700.
Sometimes there will be other variations, so use the following image as a font weight guide for the variation you upload.
How to Upload WordPress Custom Font?
Before using any of the custom fonts, you need to get them, which we mentioned earlier. But once you’ve gone through the process of downloading, installing PostX, and all, now you just need to upload it.
So, now let’s show you how to upload the WordPress custom fonts.
Follow the steps below to complete the WordPress custom font uploading process easily.
Step 1: Go to Custom Fonts
To upload a custom font, we have to go to the PostX custom fonts section.
From the WordPress Dashboard, locate and select the “PostX” menu option. This will show you all PostX features. Now select the custom font option.
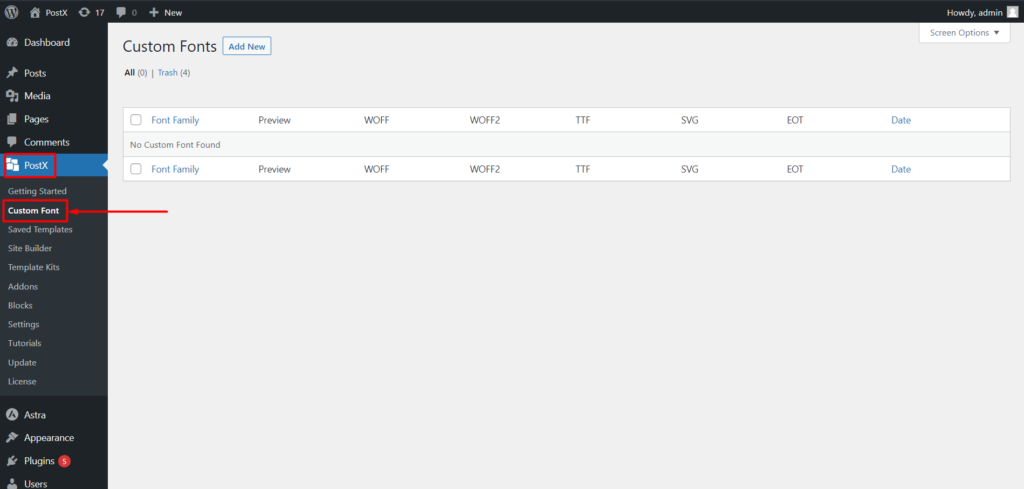
Click the “Add New” button in the Custom Fonts section. This action will direct you to the font upload page, where you can add a new custom font to your WordPress site.
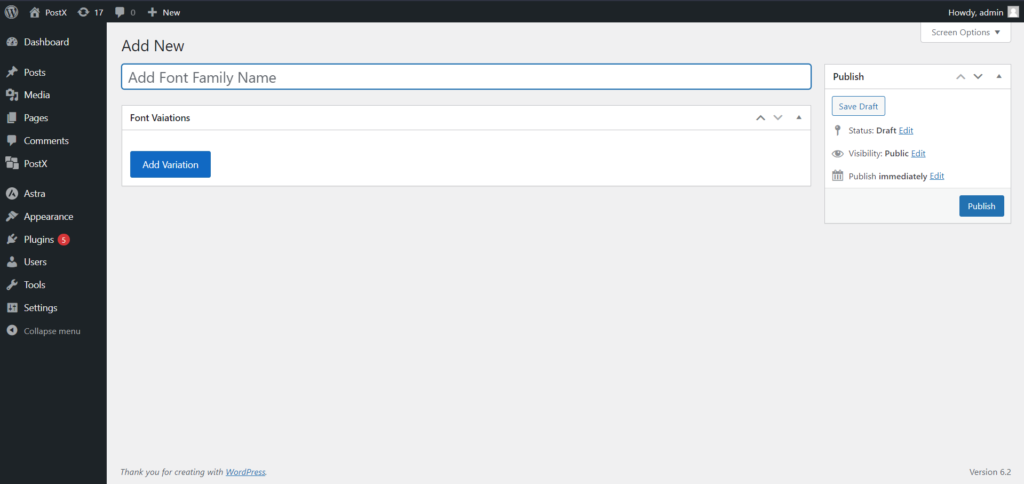
From here, you can add new custom fonts or customize previously added ones.
Step 2: Go to Font Upload Page
Now we can upload our desired custom fonts.
When uploading a new custom font, provide a name for the font. This is a crucial step to ensure that the font is easily identifiable and distinguishable among other fonts on your list.
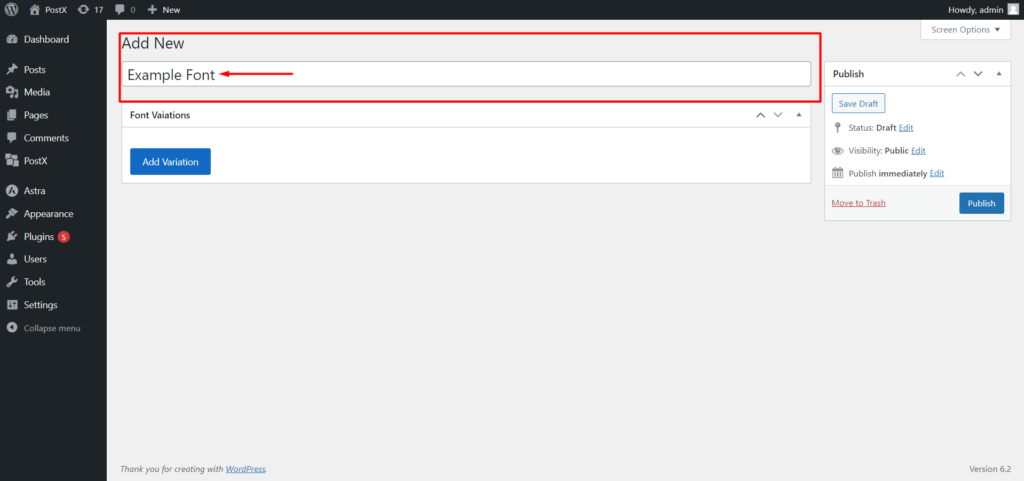
To upload the custom font, click the “Add Variation” button. This action will reveal the font upload options.
Step 3: Select Font File Type
PostX supports multiple custom font formats, such as WOFF, WOFF2, TTF, SVG, and EOT. Choose the appropriate font format for you.
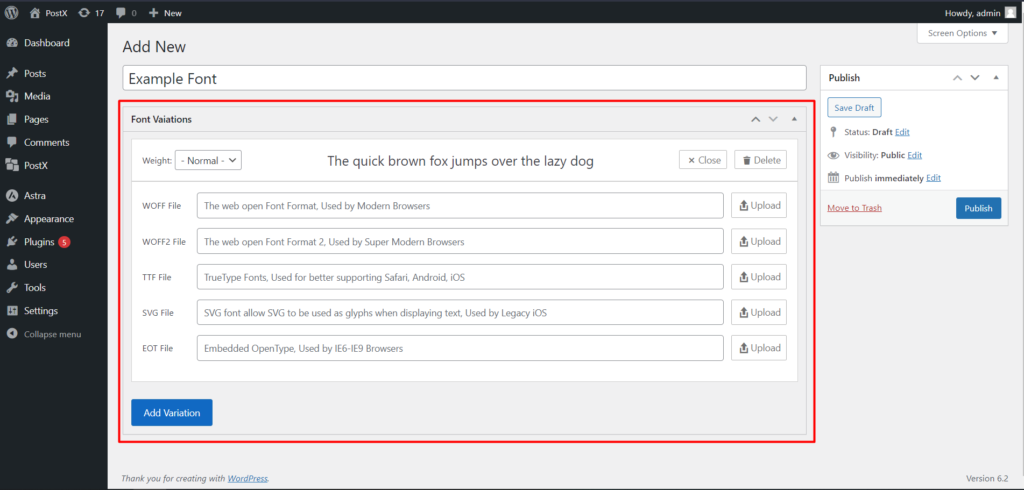
Once you have selected the font format, click on “upload” to browse and select the font file from your computer. We will upload the font with WordPress’s media library. So you’ll have no issues with the uploading process. This file will then be uploaded to your WordPress website.
Step 4: Choose Font Weight
If you have multiple versions or variations of the same font, it’s important to specify the font weight. Font weight determines the thickness or boldness of the characters and is crucial for proper font styling.
Select the desired font weight from the available options in the PostX plugin.

Once Uploaded it will display the preview of the font you’ve uploaded, so it’ll be easier for you to check before completing the process.
Step 5: Add Font Variation
If you have additional font variations, such as thin or bold, you can upload them as well. Click on the “Add Variation” button again to add another variation of the custom font.
Name the variation the same as the initial version of the font. Upload the font file for this variation, and once again, select the corresponding font weight for the specific variation.
For example, we will add a regular and bold variation of a font. So, when uploading the “regular” variation, we will select the weight: 400.

Then, click Add variation to another variation. And for the “bold” variation, we will select the weight: 700.
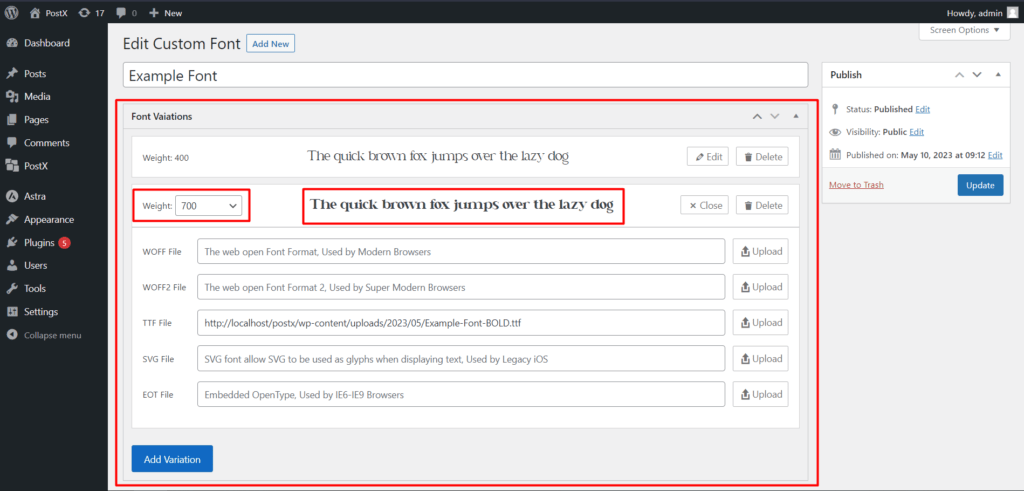
Note that, you can upload unlimited variations for a font, it is not limited to only two. We have shown two variation options to make the process simpler.
Step 6: Complete the Upload Process
After you have uploaded all the desired font variations and specified their font weights, click on the “Publish” button. This action will save and publish the custom font, making it available for use on your WordPress website.
How to Use WordPress Custom Fonts?
We have completed the custom font uploading. And the custom fonts will now be available in all of the PostX blocks for use that have typography settings. Now let’s show you how to use it.
Step 1: Create a New Page
You need to create a new page on your WordPress website first. You can do this by navigating to the WordPress Dashboard’s Pages section and clicking “Add New.”
Step 2: Add PostX Blocks
Within the new page editor, add PostX Blocks to the page. These blocks provide enhanced features and customization options, including typography-related settings for custom fonts.
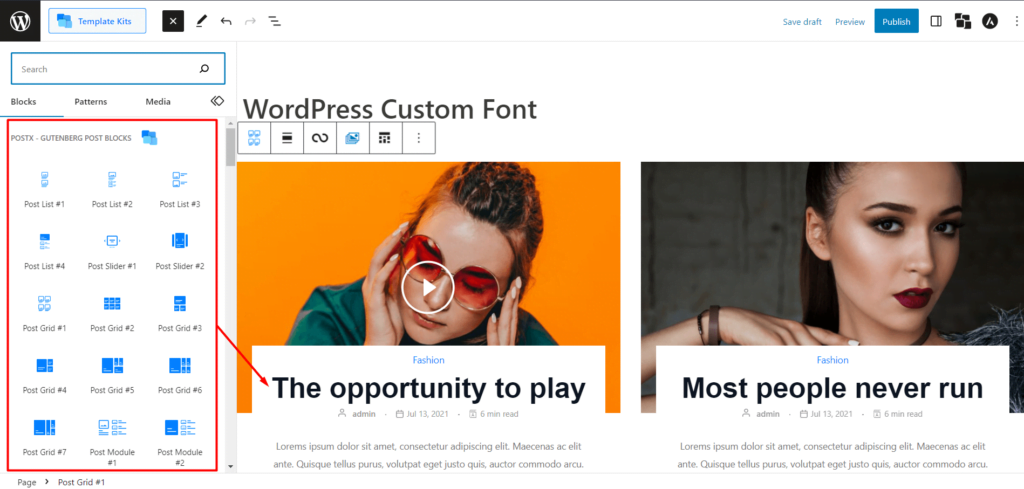
However, for this example, we will use the Post Grid block. But you can use any PostX blocks to use custom fonts and typography settings.
Step 3: Go to Typography Setting
Select the Post Grid block or any other PostX block you have added to the page. Locate the title settings first and then its typography settings for the selected block. This will let you select the preferred custom fonts. Also, these settings allow you to customize the font style and appearance.
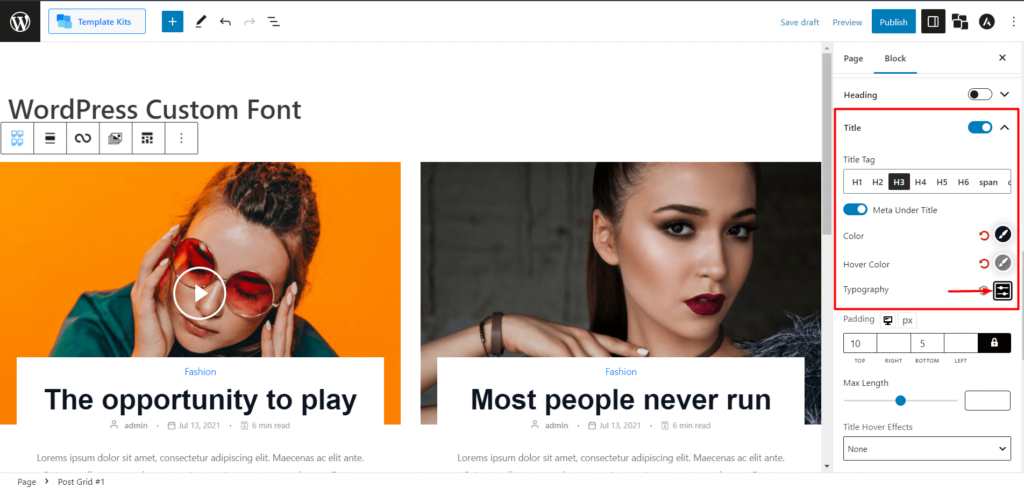
Step 4: Selecting Custom Font
Within the typography settings, look for the option to customize the font family. Click on the “Customize” button to access the font customization options. A drop down menu labeled “Family” will appear.
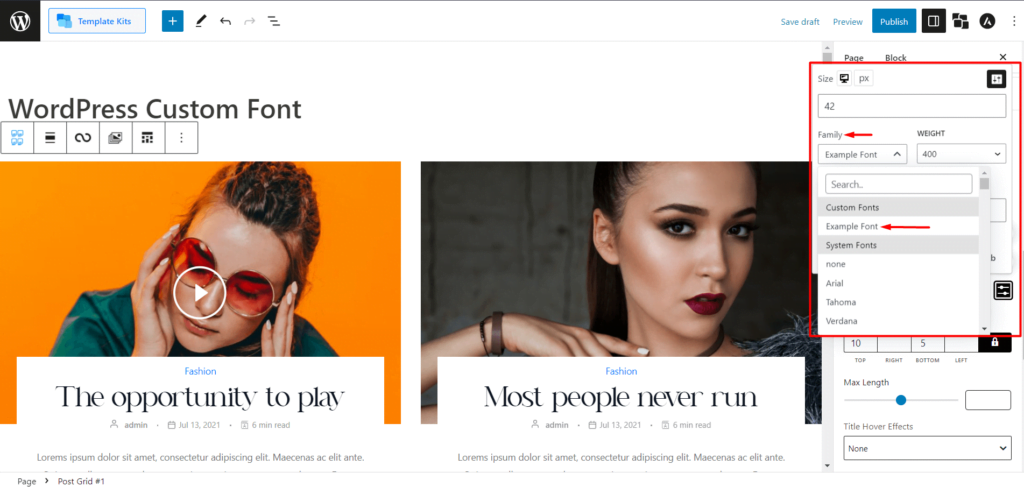
You will see two parts from the Family dropdown: custom fonts and system fonts. All uploaded custom fonts will be shown in the custom font section. But be sure not to add a name for your font when uploading.
Now, select your desired custom font.
Step 5: Select Font Weight
After selecting the custom font from the dropdown, you must choose the font weight. The weight options will be based on the variations you uploaded earlier.
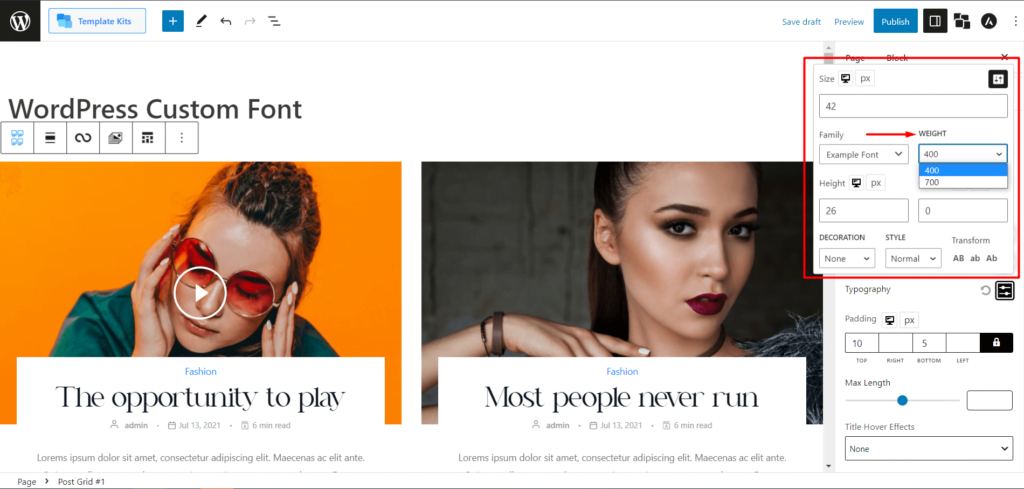
For example, we have “regular” and “bold” variations with weights 400 and 700, respectively, select the appropriate weight to achieve the desired font style.
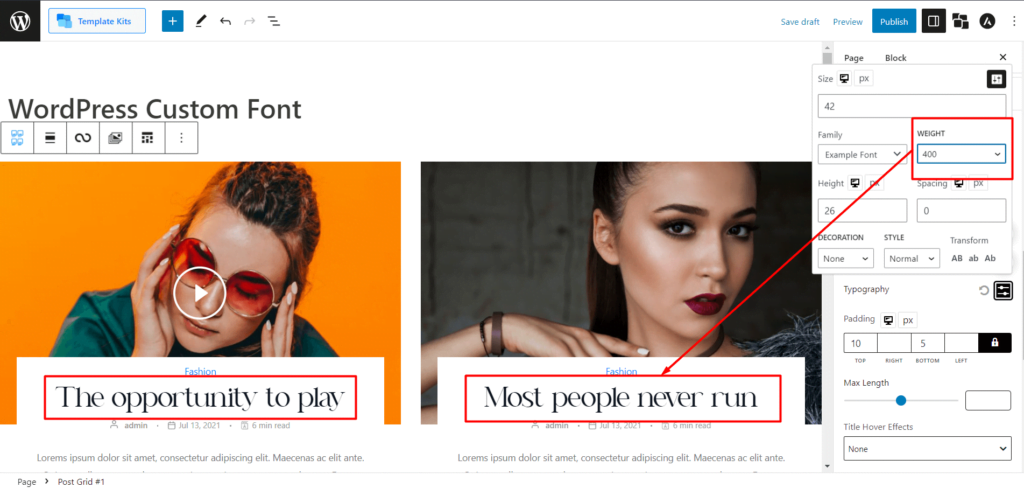
First, let’s choose the weight of 400 for a regular font style, and here’s the preview:
Now, let’s select the weight 700 for a bold font style and check the preview:
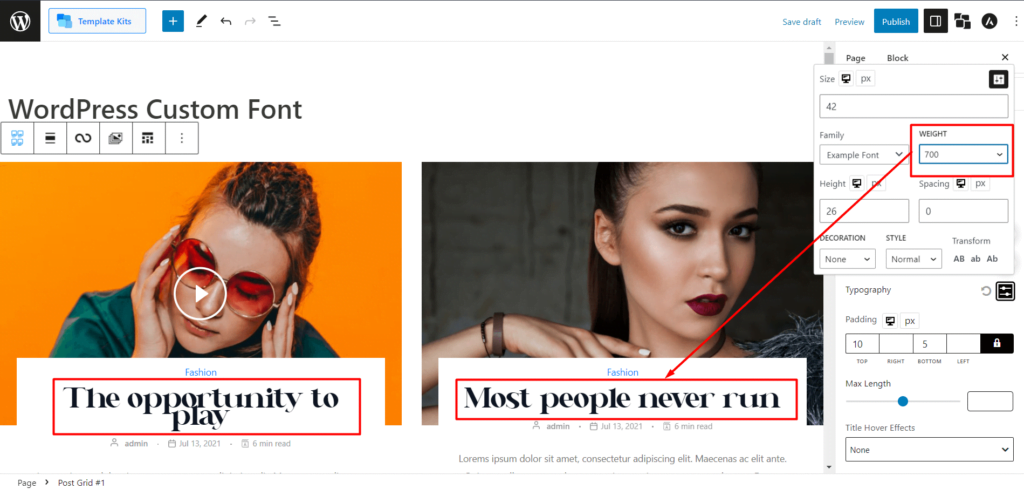
As you see, you have the same font name with a different weight, showcasing different font variations.
Step 6: Adjust Font Settings
Once you have selected the custom font and its weight, you can further adjust the font settings according to your preferences.
The typography settings may include font size, line height, letter spacing, and more options.
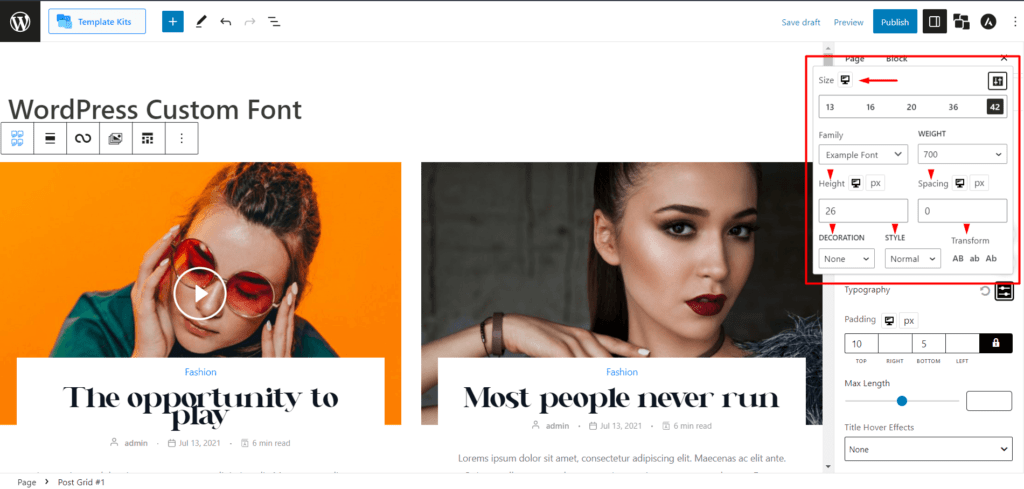
Modify these settings to achieve the desired typography style for your PostX block.
Step 7: Publish the Page
After customizing the font settings, review the changes you have made. Once you are satisfied with the font styling and overall page content, click the “Publish” button to make your page live on your WordPress website.
But there are more customization options with PostX. So, if you are not satisfied with the customizations, let’s move on to further customizations.
How to Further Customize WordPress Custom Fonts?
So, as we have said, PostX provides more customizations. Let’s not waste time and check them.
Step 1: Font Size Customization
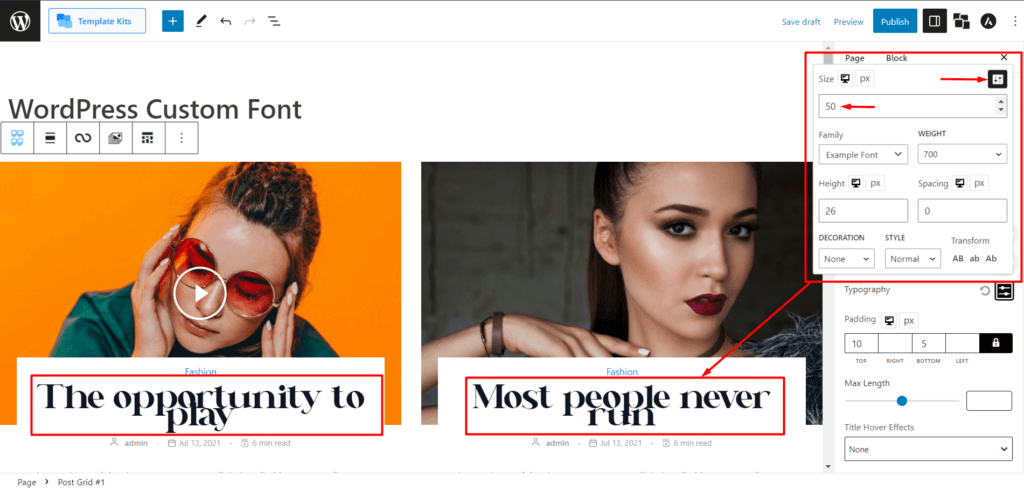
In the typography settings of your chosen PostX block, locate the option for font size customization.
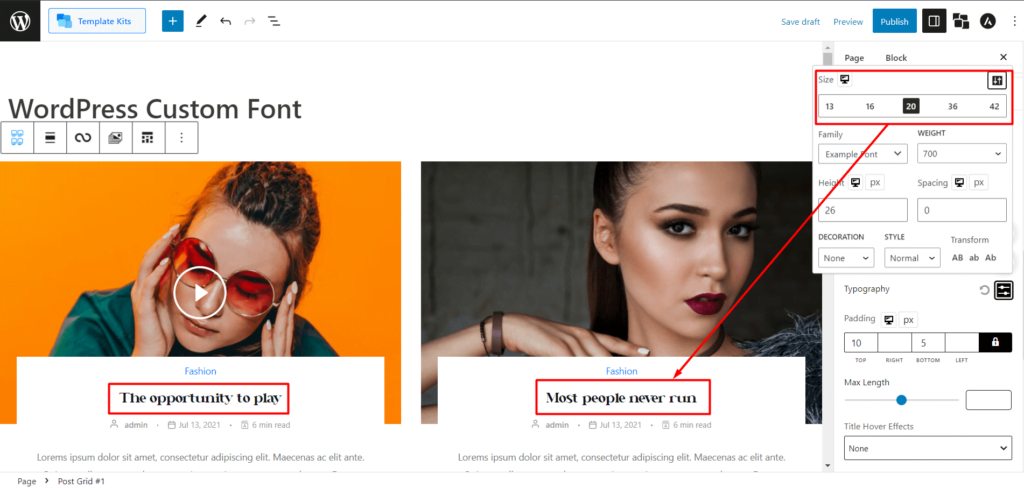
To change the font size, you can either select a fixed font size (such as 13, 16, 20, 36, 42) or enter a custom font size using the input field provided. This allows you to make the font smaller or bigger as desired.
Step 2: Font Decoration Customization
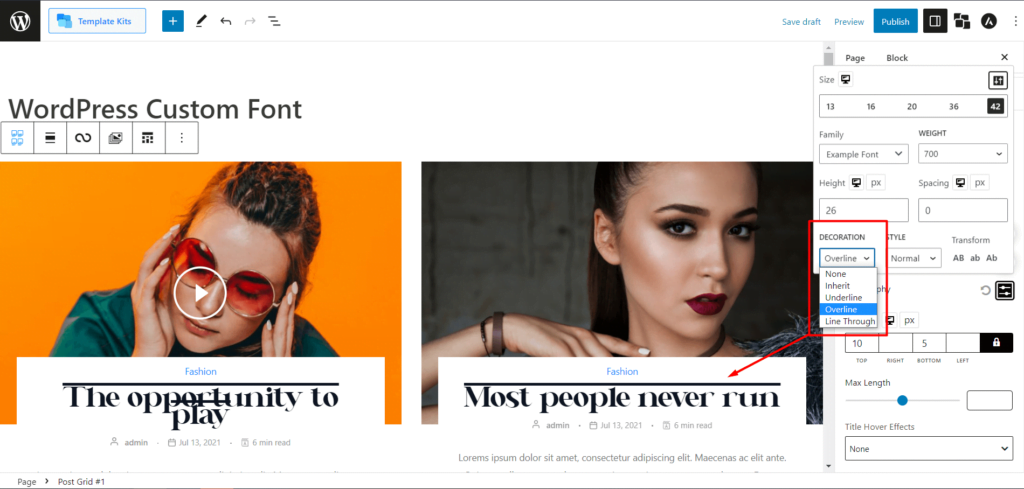
Within the typography settings, find the options for font decoration customization.
PostX provides the ability to change font decorations, such as underline (adding a line under your text), overline (adding a line over your text), and line through (adding a line through your text).
Let’s see a preview of each.
Underline Preview:

Overline Preview:
Line Through Preview:
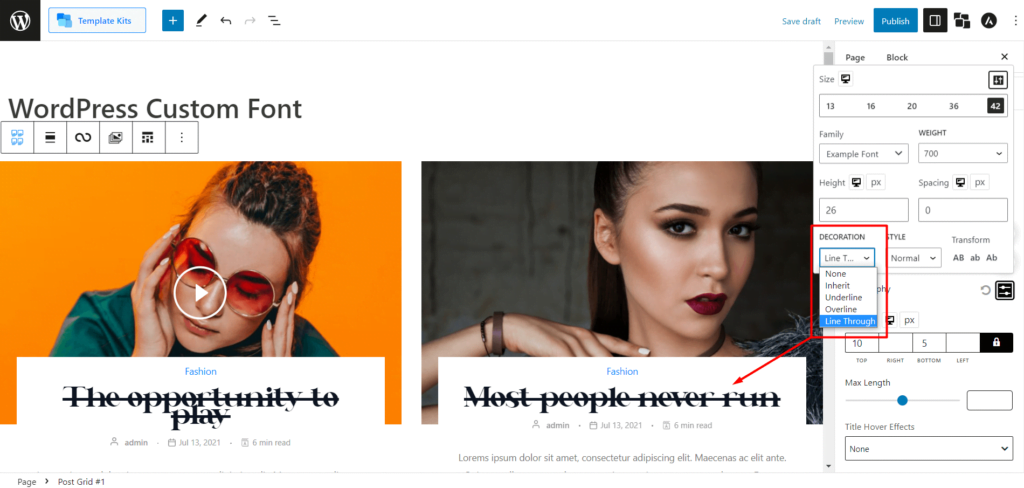
Choose the desired decoration option(s) for your custom font.
Step 3: Font Style Customization
Locate the font style customization options within the typography settings of PostX.
PostX allows you to change font styles. Currently, you can select from options such as italic (semi-cursive style) and oblique (artificially slanted style similar to the italic. Note: Some fonts might not support this).
For example, come across a perfect font for your website that lacks an italic variation. PostX can help you achieve the italic style by providing font style options.
Let’s see the preview in italic:
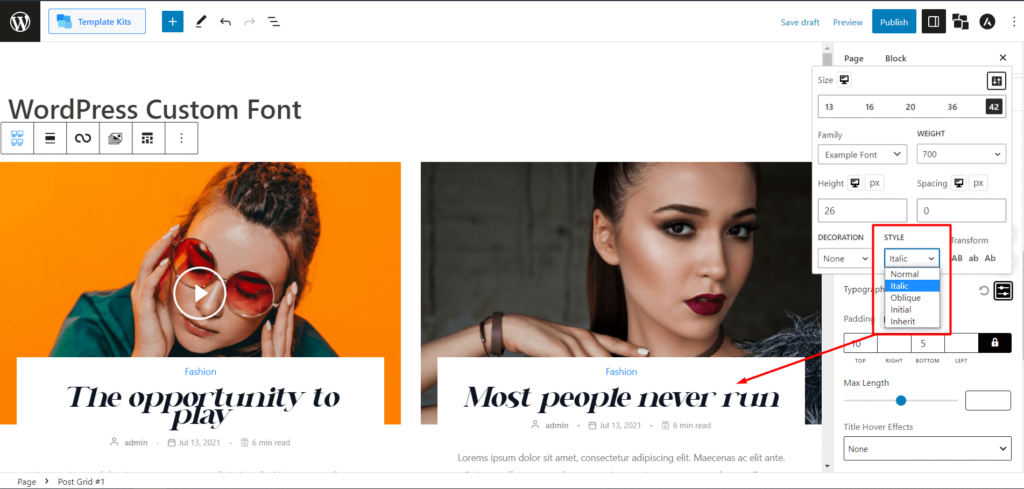
Always choose the font style that suits your preference.
Step 4: Font Transformation Customization
PostX enables you to transform your font text into different cases: AB (all capital case), ab (all lower case), and Ab (title case).
Let’s see the preview of each.
AB (all capital case):
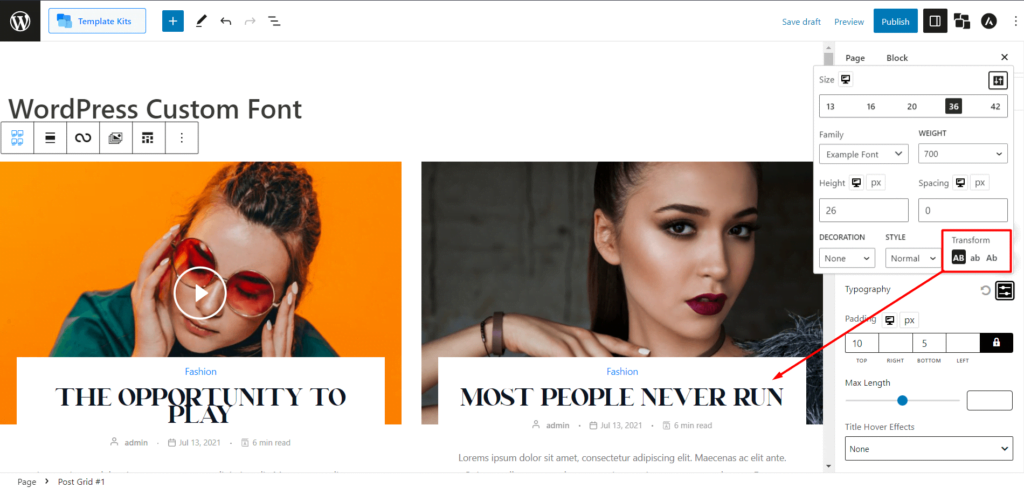
ab (all lower case):
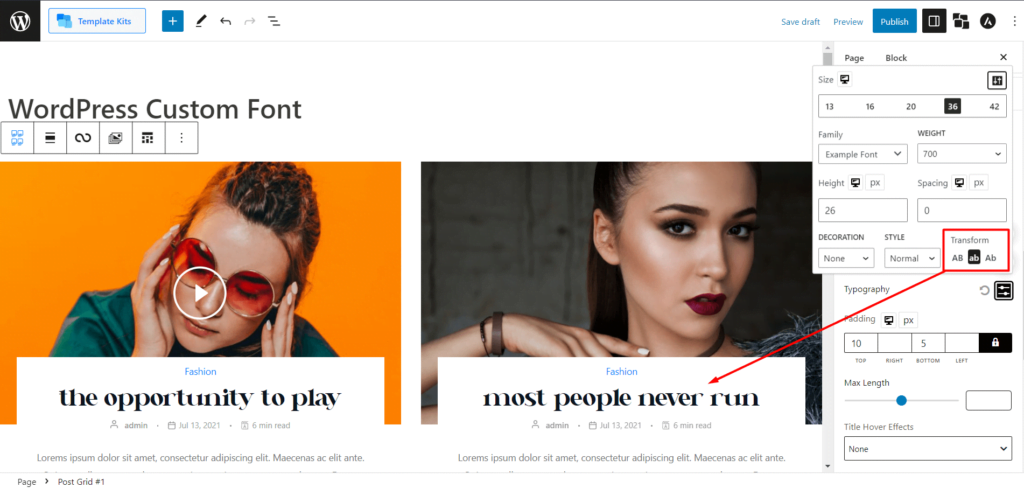
Ab (title case):
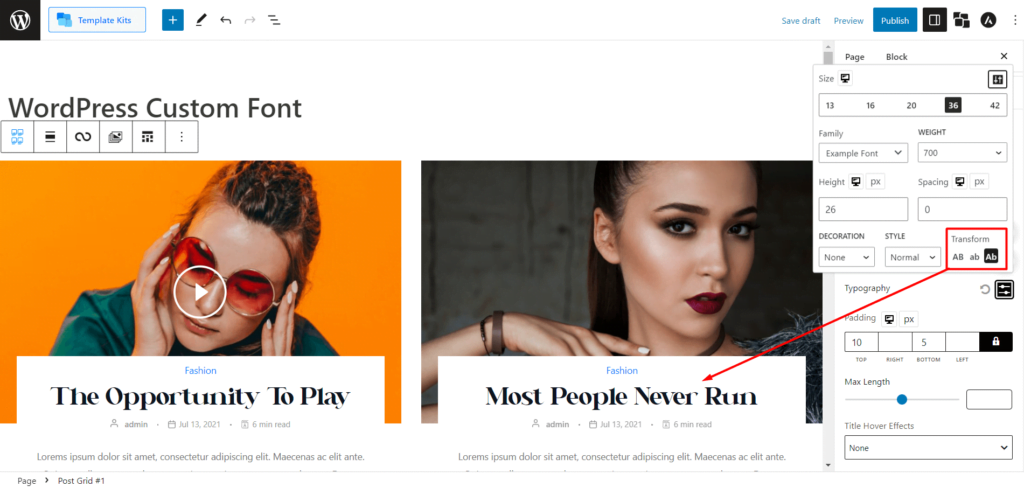
Select the desired font transformation option to modify the text case accordingly.
Step 5: Font Color and Font Hover Color Customization
PostX provides a color palette for changing the text color. You can select a color from the palette that suits your design.
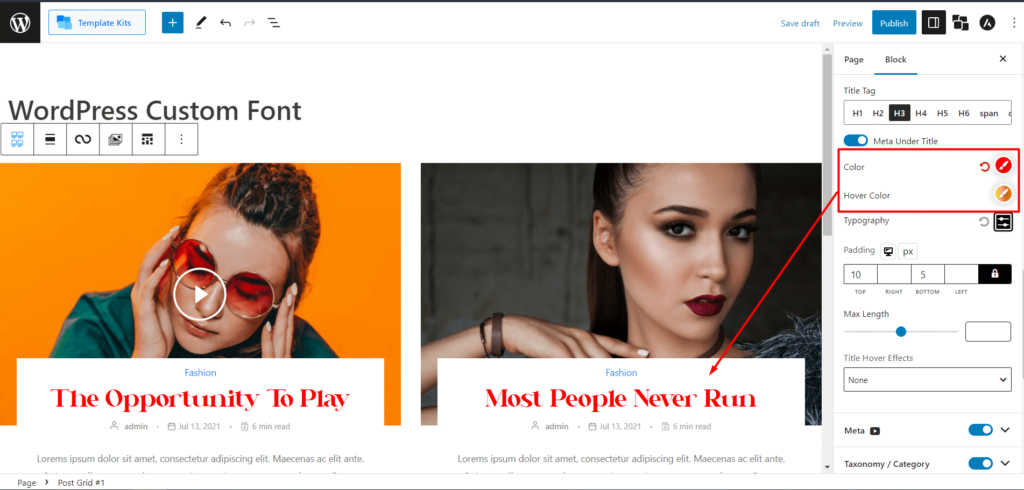
Additionally, suppose you have specific color codes in HEX, RGB, or HSL formats. In that case, you can enter those codes to change the text color accordingly.

If you wish to change the hover color of the font text, you can do that with PostX.
The settings for font hover color are similar to font color customization. You can use the color palette or enter HEX, RGB, or HSL codes to change the hover color of the text.
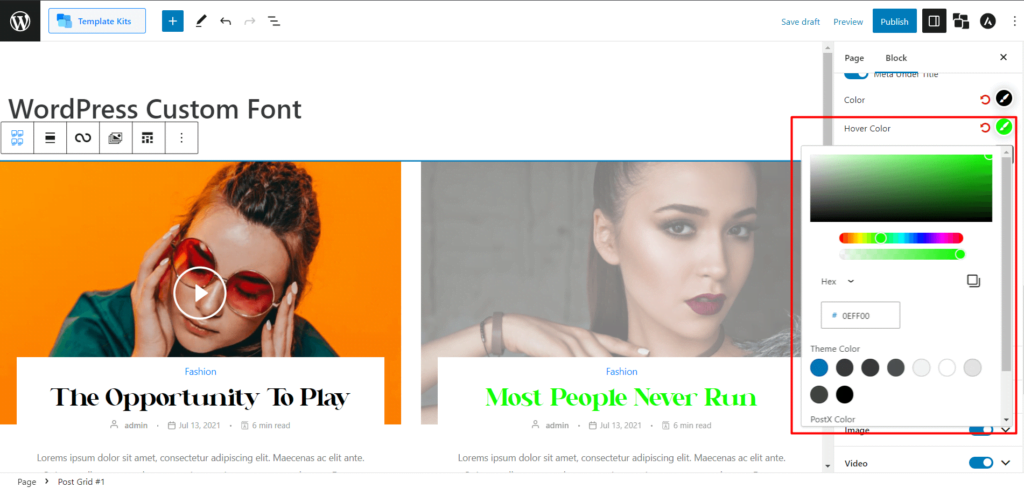
Applying these customization settings in PostX allows you to personalize your custom fonts without additional hassles.
Additional Note
The above customization options may vary depending on your specific fonts. Experiment with different settings and combinations to achieve the desired customizations for your custom fonts.
Remember to publish or update your changes after customizing the font settings to see the updated appearance of your custom fonts in your PostX blocks.
Benefits of WordPress Custom Fonts
Using WordPress custom fonts can offer several advantages, enhancing your website’s typography and user experience. Here are the key benefits of implementing custom fonts:
Improved Visual Appeal: Custom fonts allow you to differentiate your website’s typography, creating a unique and visually appealing design that aligns with your brand identity.
Enhanced Readability: Carefully chosen custom fonts can enhance readability, ensuring visitors can easily consume and understand your website content.
Brand Consistency: Using custom fonts that align with your brand guidelines can reinforce your brand identity, creating a cohesive and consistent visual experience across your website.
Unique User Experience: Custom fonts contribute to a distinctive user experience, setting your website apart from competitors and leaving a memorable impression on visitors.
Increased Engagement: Typography captures and retains users’ attention. Well-selected custom fonts can captivate your audience, increasing engagement and time spent on your website.
Wide Font Selection: WordPress offers a vast library of custom fonts, giving you access to a diverse range of font styles and options to choose from, ensuring you find the perfect match for your website’s aesthetic.
Easy Implementation: With WordPress’s user-friendly interface, integrating custom fonts into your website is straightforward. You can install and activate font plugins or use theme options to apply custom fonts without extensive coding knowledge effortlessly.
Responsive Design: Custom fonts can adapt to different devices and screen sizes, ensuring your typography remains visually appealing and legible across desktops, tablets, and mobile devices.
Flexibility and Control: By utilizing custom fonts, you have full control over the appearance and placement of text elements on your website. You can adjust font size, line spacing, and other typographic settings to achieve the desired look and feel.
Custom fonts into your WordPress website enhance its aesthetics, readability, and overall user experience. By leveraging the diverse range of available fonts, you can create a visually captivating and on-brand website that leaves a lasting impression on your visitors.
FAQs
Q: Can I use any font as a custom font in WordPress?
A: While WordPress offers a wide selection of custom fonts, you can also upload your own fonts in various formats like WOFF, WOFF2, TTF, SVG, and EOT using plugins like PostX. However, ensuring you have licensing rights for the fonts you upload is important.
Q: Will using custom fonts affect my website’s loading speed?
A: Custom fonts can add load time to your website, especially if you have multiple custom fonts or large font files. Optimizing your font files and implementing caching techniques is essential to minimize any negative impact on loading speed.
Q: Do custom fonts work across all devices and browsers?
A: Custom fonts can be used across different devices and browsers. However, choosing fonts with good cross-browser support is recommended, and ensuring they are responsive to maintain a consistent visual experience across various screen sizes and devices is recommended.
Q: Are there any limitations to using custom fonts in WordPress?
A: While using custom fonts in WordPress offers numerous benefits, it’s important to consider a few limitations. Some custom fonts may not support all languages or characters, so ensure the fonts you choose are compatible with your website’s content requirements. Additionally, using too many custom fonts can negatively impact performance and may not be optimal for user experience.
Conclusion
WordPress custom fonts give website owners a powerful tool to enhance their site’s typography, visual appeal, and user experience. By carefully selecting and implementing custom fonts, you can create a unique, engaging design that aligns with your brand identity.
With the user-friendly interface of plugins like PostX, adding custom fonts to your WordPress website is simple and efficient. Whether you choose fonts from Google Fonts, font marketplaces, or premium font libraries, you have a wide range of options to find the perfect fonts for your website.
Take advantage of WordPress custom fonts to elevate the aesthetics, readability, and overall user experience of your website and make a lasting impact on your audience.
You can check out WordPress video tutorials on our YouTube Channel. Also, find us on Facebook and Twitter for regular updates!

