WooCommerce will create your cart and other necessary pages automatically. What if you wish to make changes, then? Want to customize your own WooCommerce add to cart button?
If you have been using WooCommerce for some time, you may know that WooCommerce doesn’t provide many customization possibilities. Any WooCommerce page layout can be modified by switching themes. Still, you don’t have access to all available editing features. What then? Editing the WooCommerce Checkout Process
Here, you’ll learn how to customize WooCommerce Add to Cart button to better suit your needs and drive more business to your online shop.
Is Customizing the WooCommerce Add to Cart Button Best for Your Business?
If you own a WordPress site and want to sell products online, you should use WooCommerce. While it does an excellent job out of the box, you can really make your online shop shine by tinkering with the options.
Streamlining and simplifying the purchasing procedure is a tried-and-true strategy for attracting more buyers.
We’ve seen a variety of checkout page customization and optimization choices, all to increase conversion rates and decrease abandonment rates. The preceding step in the sales funnel is, however, also crucial.
If your business’s typical consumer buys many items, or if you want them to browse your store and add and remove items before checking out, the “Add to Cart” button is a must-have.
Contrarily, several online shops choose a more streamlined purchasing procedure, bypassing the “Add to Cart” screen to send clients straight to the checkout.
It’s perfect for single-item shops when customers know they’ll only leave with one item. Though shorter buying cycles sometimes provide better results, this is not always the case, depending on the goods and services offered.
How to Customize WooCommerce Add to Cart Button?
You can use various methods to create a unique “Add to Cart” button in WooCommerce. In addition, you have complete control over customizing the look of the “add to cart” button to match your online shop and its wares. To modify the Add to Cart button in WooCommerce, you may need to be familiar with coding or use a third-party plugin or theme.
Good news for you, because we will show you both ways to customize the add to cart button.
But first, let’s discuss the customization process without using any plugin.
Customize WooCommerce Add to Cart Button Without Plugin
The “add to cart” button can be customized by altering the text display. For example, it is possible to customize the text of the “Add to Cart” button to better fit your online shop’s tone and purpose. Likewise, you can customize the text of the WooCommerce shopping cart buttons to suit your needs.
How to Chnage Add to Cart Button Text
Use the instructions below to customize the text of your shopping cart’s “Add to Cart” button.
- Go to WordPress dashboard and go to Appearance → Theme Editor.
- Open the Theme Functions (functions.php) file for your theme.
- To the end of the function.php file, add the following codes.
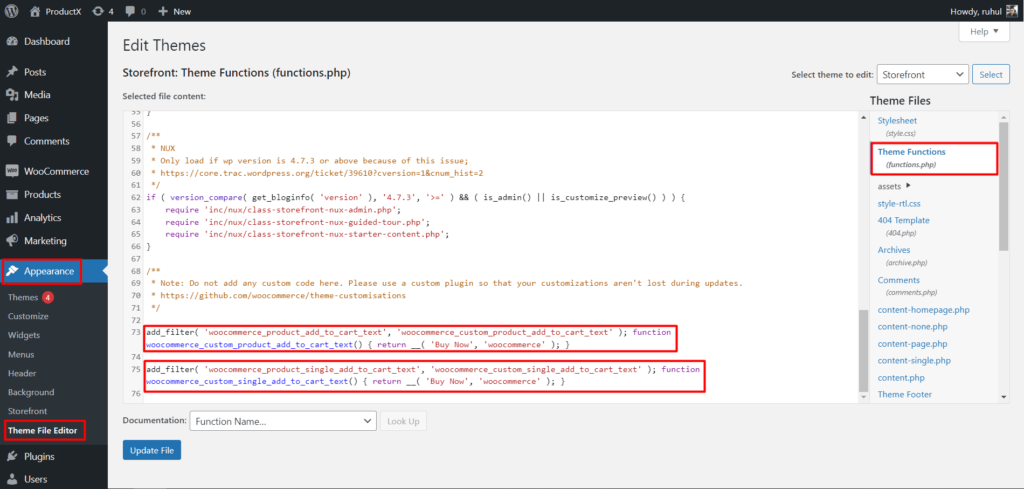
To change the add to cart text on the shop page:
add_filter( 'woocommerce_product_add_to_cart_text', 'woocommerce_custom_product_add_to_cart_text' );
function woocommerce_custom_product_add_to_cart_text() {
    return __( 'Buy Now', 'woocommerce' );
}
Here’s how it will look after inputting the code:
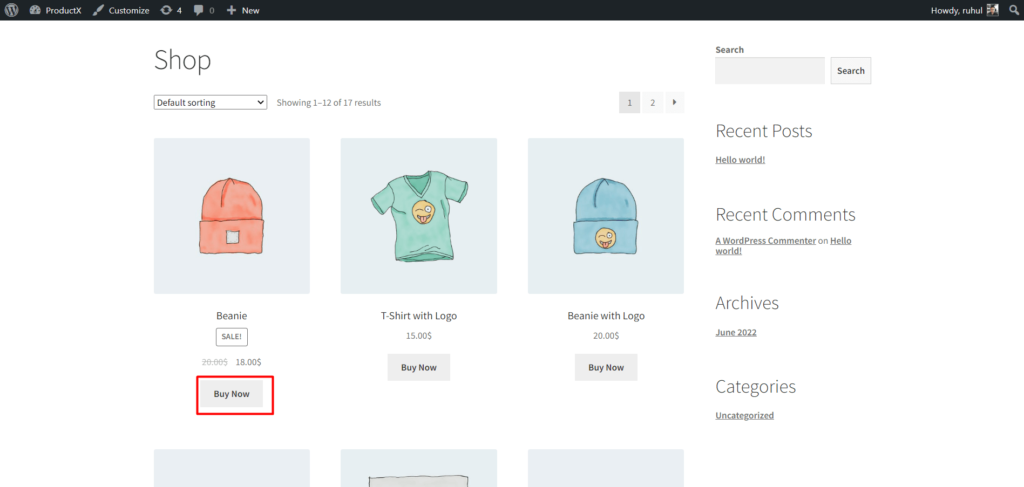
To change the add to cart text on the single product page:
add_filter( 'woocommerce_product_single_add_to_cart_text', 'woocommerce_custom_single_add_to_cart_text' );
function woocommerce_custom_single_add_to_cart_text() {
    return __( 'Buy Now', 'woocommerce' );
}
Here’s how it will look after inputting the code:
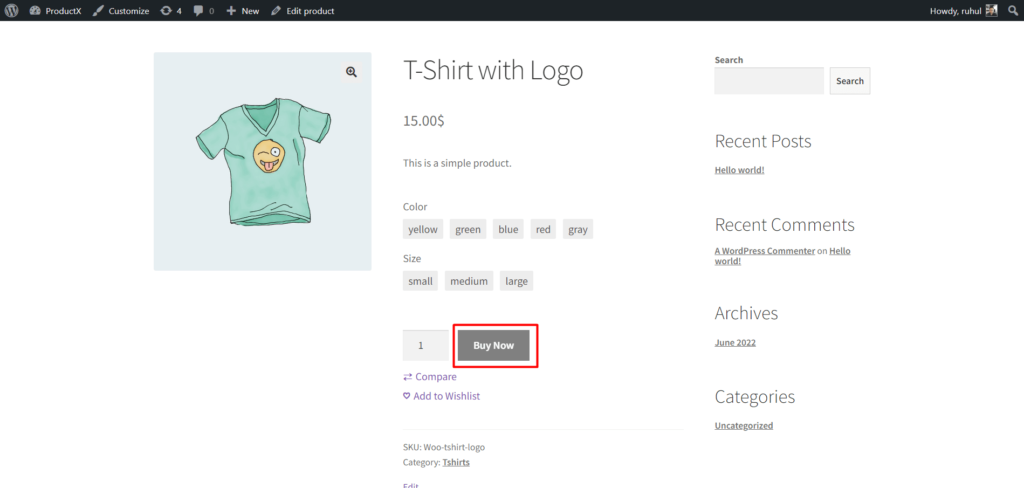
Customize Add to Cart Typography
Select Additional CSS to include your custom code for customizing the font, color, and size.
Changing Add to Cart Typography on Single Product Page:
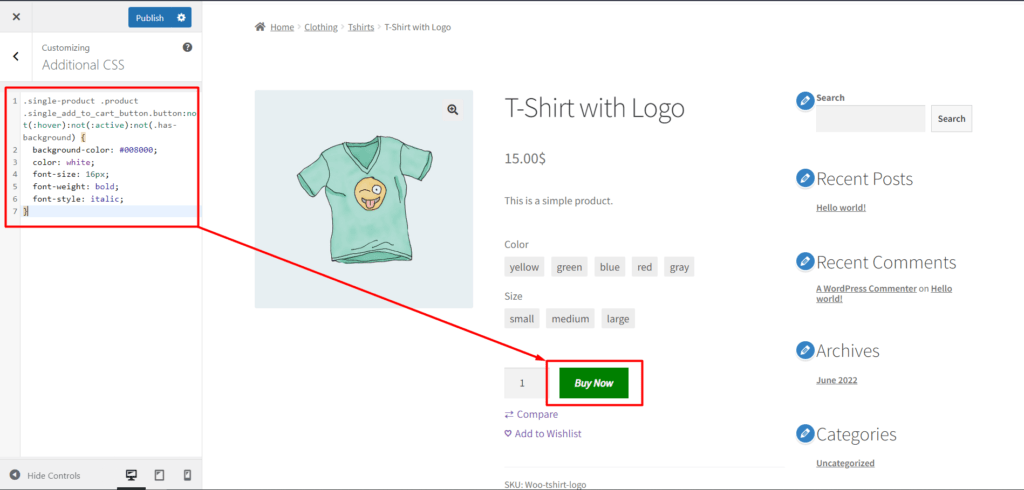
- Go to your single product page, then click customize.
- Select Additional CSS.
- Then type the following code:
.single-product .product .single_add_to_cart_button.button:not(:hover):not(:active):not(.has-background) {
	background-color: #008000;
	color: white;
	font-size: 16px;
	font-weight: bold;
	font-style: italic;
}
Changing Add to Cart Typography on Shop Page:
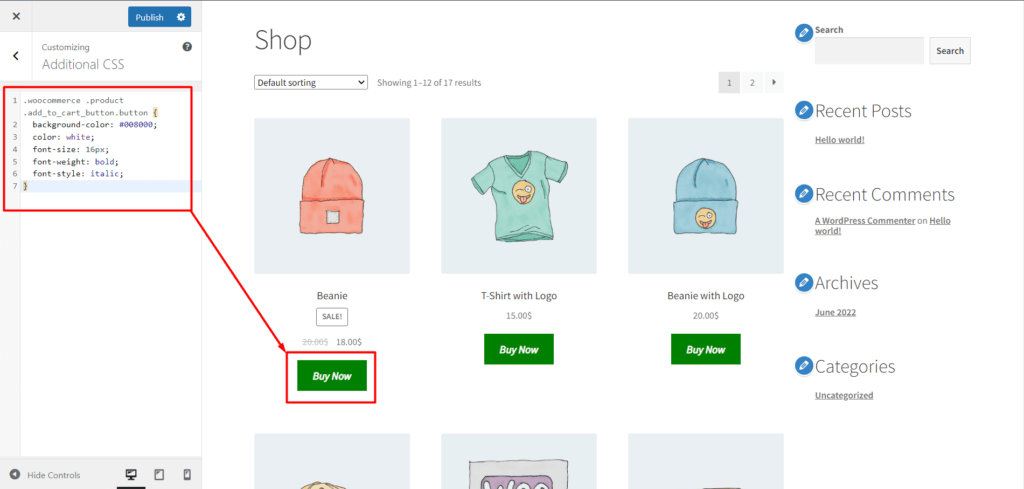
- Go to your shop page, then click customize.
- Select Additional CSS.
- Then type the following code:
.woocommerce .product .add_to_cart_button.button {
	background-color: #008000;
	color: white;
	font-size: 16px;
	font-weight: bold;
	font-style: italic;
}
Customize WooCommerce Add to Cart Button With Plugin
Now we will show you how to customize WooCommerce ‘Add to Cart button using an amazing plugin named ProductX.
Installing ProductX
To use ProductX, you need to install it first. To install ProductX, you need to:
- Go to the Plugin section from your WordPress Dashboard.
- Type the plugin name “ProductX” on the Search Bar.
- Install and Activate the ProductX plugin.
Turn on WooCommerce Builder Addon
WooCommerce Builder is an extension for ProductX. You can use these pre-made layouts as a starting point for your online store’s homepage, category pages, archive pages, and shopping cart and product detail pages. We need to activate the builder before we can start working with it. To do that:
- Go to the ProductX section.
- Click on “Addons” to go to the All Addons section.
- Then turn on Builder Addon.
Customize Add To Cart Button on Shop Page
To customize the add to cart button on the shop page, you’ll need to create a template first. We won’t bother you by telling you all the steps you need to follow to create a template. Instead, you can check this article which provides a thorough process for creating a shop page template.
After creating a template and adding blocks to create your shop page, you can move to the customization process.
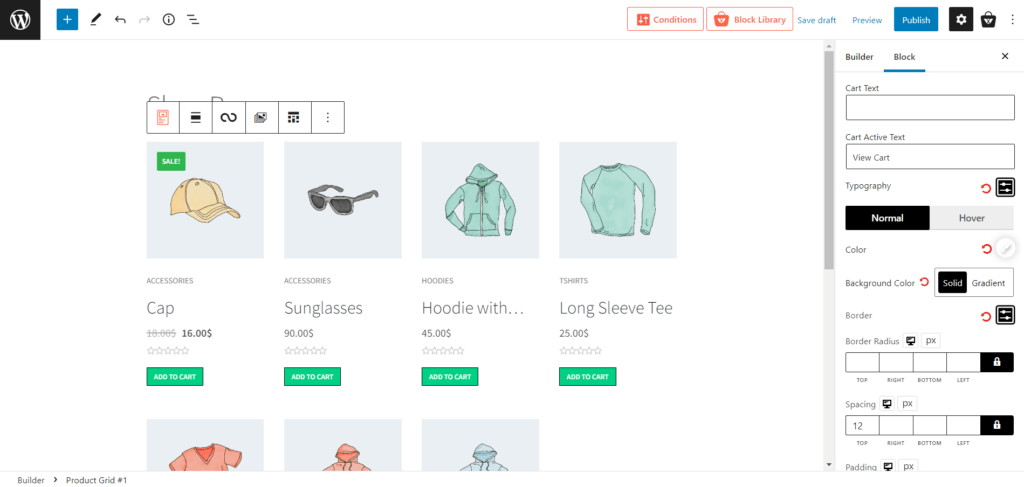
When you select a product list/grid, you’ll see the settings option on the right sidebar. From the settings, enable cart, and the add to cart text pops up. Also, this cart setting itself is a drag-down menu. And when you click it, you’ll see a heck ton of customization options.
You can customize everything from the text and text color to size, border, spacing, and everything in between. Also, ProductX has added a typography setting in the cart drag-down option.
You can use it to select the font style, size, height, weight, spacing, and also decorations like inherit, underline, overline, and line through.
It also has a color settings option which you can use to change the color for your add to cart button, texts, border color, background color, and much more.
Customize Add To Cart Button on Single Product Page
Just like before, you’ll need to create a template before you can change the look of the “add to cart” button on single product pages. We won’t waste your time outlining everything you must do to make a template. Instead, check this article to learn a step-by-step procedure for creating a single product page template.
So, when you create a single product page, you add “Product Add To Cart” blocks. And this block itself provides the add to cart button along with all the necessary customization.
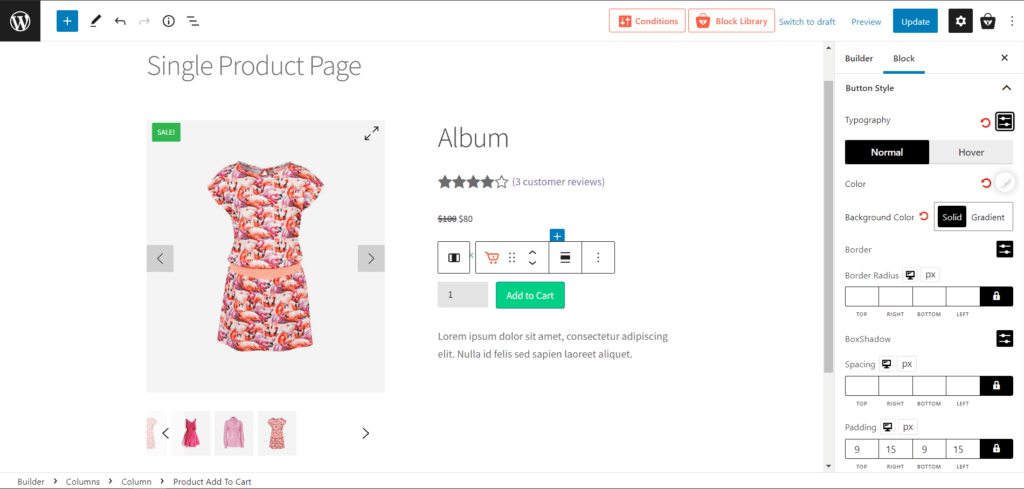
Then, you can change the texts, colors, and all the typography customizations we mentioned above, just like you have on a shop page.
ProductX gives you the complete control to customize your add to cart button without using codes.
Conclusion
ProductX is all about flexibility and customization, which is why it gives you access to all the options you need to customize the appearance and operation of the WooCommerce add to cart buttons. However, we’ve shared both processes of customizing add to cart buttons with and without codes, so you know what customization flexibility you want. Best of Luck!
You can check out WordPress video tutorials on our YouTube Channel. Also, find us on Facebook and Twitter for regular updates!

